On october 2005, MySQL AB, MySQL database official producer, announced that MySQL 5.0 had been finally released. Until now, the most update version has been continually developed. To find out the newest version of MySQL please check out it's official website http://www.mysql.com.
Download
In order to install and use MySQL, first we need to download the software on it's official website http://www.mysql.com or direct address http://www.mysql.com/downloads/installer/5.0.html#downloads. Next, select the appropriate platform to be installed to with a computer platform that we use. If Windows is used then select the Windows. For windows, there are three options platform :
- Windows Essential (x86)
- Windows (x86)
- Windows, without installer
Step 1:
Suppose after downloading Windows basis of MySQL, i save MySQL installation package to directory C: \ directory download \ mysql then the full name of the file will be mysql-5.0.15-win32.zip.
Step 2:
Choose the appropriate file then press ENTER (or double-click mouse on file) to run the extraction process of the file (usually with compression software like WinZip, WinRAR, etc). This time i use WinZIP software then click icon Extract.
Step 3:
Direct the destination of extraction directory to directory C:\TempMySQL (it is no problem if you choose another directory). Continue by pressing Extract button.
Step 4:
For a moment WinZIP will extract MySQL package to the destination directory C:\TempMYSQL. When finish, get out of Winzip software by pressing icon (X). In the destination folder there will be only one file named SETUP.EXE.
Step 5:
Now we go to directory C:\TempMySQL (or the directory you created before). There will be file named SETUP.EXE. Choose and double-click this file (or press enter) to run installation process.
Step 6:
Welcome window will be presented to your windows screen. To continue installation process click button Next>.
Step 7:
On this window, you will be directed to choose a type of installation would be run. The easiest one is Typical installation. For unexperienced user, it is suggested to choose Typical installation. For this example, we use typical installation. To continue installation process, please click button Next.
Step 8:
The next display is confirmation of installation process. On this window you will be confirmed whether to continue the installation process or not. MySQL software will be installed to directory C:\Program Files\MySQL\MySQL Server 5.0\. Because we use Typical installation, then installation directory cannot be changed (except we use custom installation on step 7 above). For a while just follow the instruction. Click button install to continue.
Step 9:
For this step, you can relax for a while as of waiting the installation progress.
Step 10:
On the next window, you will be offered to join to be MySQL.com member for free. If you interest to join, then choose Create a new free MySQL.com account. If you already have an account on MySQL.com, then choose second option (Login to MySQL.com). For this time, we choose the third option (Skip Sign-Up). Continue the installation process by pressing button Next>.
Step 11:
Wait a while until the installation is complete. It advised to proceed to MySQL server configuration (Configure MySQL Server now). Now we can press Finish on this stage. (but we continue with the configuration process)
Step 12:
Are you ready to configure MySQL server? Please click on the next button
Step 13:
There are two configuration options. Detailed Configuration and Standard Configuration. We just choose Detailed Configuration, because it makes server become more optimal. Click on the Next > button to continue
See Also : Data Definition Language (DDL) in Database
Step 14:
On the next, there are 3 types of server options: Developer Machine, Machine Server or Dedicated MySQL Server Machine. For this tutorial, we should choose Developer Machine. Thus MySQL will not monopolize computing resource in your computer. Click on the Next > button to continue
Step 15:
Next screen, the purpose of MySQL installation. There are 3 options, multifunctional Database, Transaction Database Only or Non transactional Database Only. For this tutorial, we choose the course Multifunctional Database. Click on the Next > button to continue.
Step 16:
On this stage where determine where InnoDB table types will be installed. Start MySQL 5.0.x. InnoDB is included in the package. With the InnoDB allows you to do a Transaction in the database. Where the MyISAM table (which is the default table type in MySQL) do not support the Transaction. At this stage just choose standar selection, and proceed by clicking the Next button
Step 17:
On the next view, there are 3 options for the maximum number of allowable connections on your MySQL server: Decission Support (DSS)/OLAP, Online Transactional Processing (OLTP), or Manual Setting. Decission Support option is sufficient for us to use in this tutorial. Continue by pressing the Next button.
Step 18:
On the next screen, if you are going to use facilities of TCP/IP to access the MySQL server or not. To use a standalone machine. This option has no effect. But for those who are connected to a network computer, may also enable the option to Enable TCP/IP Networking. There is little difference compared with the MySQL installation process 5.0.x. There is an additional option Enable Strict Mode. Enable this option only to choose what recommended by system. Continue by pressing Next button
Step 19:
Next, choices of character types you would use. Select Standar Character Set
Step 20:
Next screen, enable the option Install as Window Service and Lauch MySQL Server Automatically. With this option, program MySQL server will run automatically if computer is turned on. Viceversa, enable option Include Bin directory in Windows Path. MySQL program is usually stored in the directory C:\Program Files\MySQL\MySQL Server 5.0.x\Bin. By enabling this option, you can run MySQL program from DOS/Command Prompt.
Step 21:
The next display is about MySQL server security. You should give special password as Root, and don’t allow the other people to access your system without password. Then activate option Modify Security Setting and enter your Root password carefully. However turn off Create an Anymous Account option, then it will make the other people can sign in using your MySQL server.One more thing, it is suggested to turn off option Enable Root Access from Remote Machines. This is to prevent a gap that can be entered by irresponsible people for sneaking into our system. Continue to press Next button.

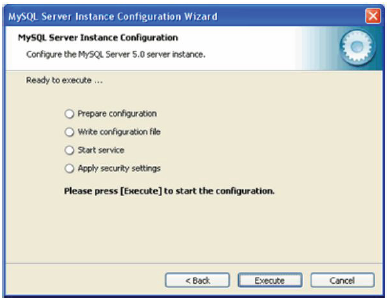
Step 22:
If you have been sure to proceed, click the Execute button. And then you can relax a little bit while wait fot the setting is completed
Step 23:
If there is no problem, then this installation and setting process of MySQL 5.0.x is finished. Please click on the Finish button to complete the process.

Step 24:
Now please do this test to access MySQL from DOS Prompt/Command Line. Type : C:>mysql-u root -p enter password: *******

Step 25:
You should also try to input some MySQL commands, such as show database, etc. If it goes as they should, so it’s time to you for relax for a moment. MySQL 5.0.x basis windows is done.
EmoticonEmoticon